

In trauma care, proper head immobilization isn’t a “nice-to-have”—it’s one of the simplest ways to reduce the risk of secondary injury during movement and transport. Some training materials note that without adequate head support, patients placed on a spine board can end up in a visibly abnormal neck position, which adds avoidable risk. And once the head and neck move uncontrollably, the spinal cord can be exposed to further damage—sometimes with life-altering consequences.
That’s why when a spinal injury is suspected, responders focus on one goal: keep the head and cervical spine aligned and stable, and keep the patient packaged securely so the whole body moves as a single unit during lifting, loading, and transport.
1) Why Head Immobilization Matters So Much
In major trauma, keeping the head, neck, and spine in alignment helps reduce the chance of neurological injury getting worse. If the cervical spine is fractured or unstable, even a small motion can translate into pressure on the spinal cord. EMS instructors say it bluntly for a reason: one bad movement can change a life.
In many training settings, a head immobilizer + cervical collar + spine board are treated as the “three-piece set” for spinal protection:
- Cervical collar: primarily limits flexion/extension and some rotation.
- Head immobilizer: uses side supports plus forehead/chin straps to reduce side-to-side movement and rotation.
- Spine board + torso straps: secures the patient’s body to the board so movement doesn’t get transmitted back into the neck.
Used correctly, these tools reduce the chance of shifting during lifts, transfers, loading, and the inevitable bumps during transport—buying time and protecting what matters most.
2) When Head Immobilization Is Indicated
Not every injured patient needs head immobilization. Modern prehospital care increasingly emphasizes SMR (Spinal Motion Restriction): reduce unnecessary spinal movement when indicated—instead of automatically putting every trauma patient on a long board for extended periods.
That said, the core principle still holds: if a spinal injury is suspected, protectively immobilize the head and cervical spine early to reduce the risk of secondary injury.
- High-energy motor vehicle collisions
High-speed crashes, rollovers, ejections, major intrusion—these mechanisms can involve cervical spine injury even when symptoms aren’t obvious. - Falls from height
Falls from ladders, roofs, upper floors, scaffolding, or embankments can load the spine hard enough to cause serious injury. - Sports injuries
High-impact contact sports collisions or diving injuries (head striking the bottom) can produce cervical spine trauma. - Explosions, collapses, multi-casualty incidents
When patients have head/neck/back pain, or incomplete limb sensation, spinal injury must be considered. - Altered mental status or unreliable exam
Unconscious, confused, intoxicated, or severely painful multi-trauma patients can’t reliably report symptoms. Guidelines and consensus approaches commonly emphasize that if there is midline cervical tenderness, altered mental status, neurological deficit, spinal deformity, or high-risk mechanism, SMR and appropriate immobilization should be considered.
3) Before You Start: Gear Checklist
To keep the process smooth (and the patient secure), confirm you have:
- Rigid cervical collar (correct adult size)
- Long spine board (or an appropriate SMR transport device per your system)
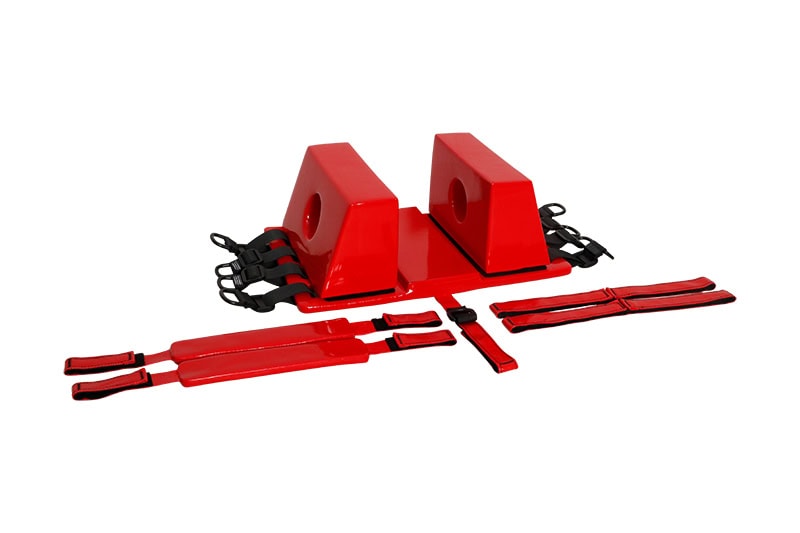
- Head immobilizer (side blocks + forehead/chin straps + base plate/Velcro attachment)
- Torso/pelvis/leg straps (or a spider strap system)
- Padding (towels/foam for filling natural gaps and protecting pressure points)
- Suction/vomiting preparedness (once the head is immobilized, turning is limited)
4) Spine Board Placement + Strap Sequence: Step-by-Step
Below is the real-world workflow for “adult spine board + head immobilizer,” with the placement and strap sequence spelled out clearly.

Step 1: Scene assessment + C-spine protection (start at second one)
- Confirm scene safety and do a rapid patient assessment.
- Assign one rescuer to manual C-spine stabilization at the head—hands on both sides of the head, keeping a neutral, in-line position and preventing rotation, flexion, or extension.
- If conditions allow, apply a properly sized rigid cervical collar as early as possible.
- Important: a collar does not replace manual stabilization or a head immobilizer. Maintain manual control until the head immobilizer is fully secured.
Step 2: Position the board at the patient (choose the least disruptive move)
A common method is the log roll, typically with at least three rescuers (head/neck control, torso control, leg control).
- Use clear commands and roll the patient as one unit, about 90°, slide the board in, then return to supine slowly.
- Keep the head–neck–torso aligned throughout; avoid twisting or excessive spinal bending.
- In tight spaces or limited staffing, alternative techniques (including scoop-style approaches) may reduce rolling—follow your local training and protocol.
After transfer, confirm the patient is positioned near the top of the board, aligned and centered, ready for securing.
Step 3: Align and center (get neutral right first)
Once the patient is on the board, quickly check:
- Head centered at the top; body symmetrical along the midline
- Ideal alignment: nose and navel roughly in a straight line; no head tilt or neck rotation
- Adults with broader shoulders may need a small amount of padding to avoid an awkward head position (do not force alignment that creates discomfort or airway issues)
- If pain forces a flexed position, don’t aggressively “straighten” limbs—secure the patient safely as found when appropriate
Keep manual stabilization at the head while you set up the strap system.
Step 4: Strap the torso and limbs first (rule: body first, head last)
Before immobilizing the head, secure the body to the board. Recommended order:
- Torso/upper chest
- Route the strap across the upper chest/shoulder area per your system design and tighten.
- Tension should be firm but should not restrict breathing—watch chest rise and comfort.
- Pelvis/hips
- Apply a pelvic strap to prevent sliding and rotational shift.
- Legs (knee/lower leg)
- Secure the legs. If your strap system allows, an “figure-8” style route can increase stability.
Secure or stow strap tails so nothing snags. If the patient is awake, communicate continuously and confirm there’s no severe pain, numbness, or circulation compromise.
Why “torso first, head last”?
If the head is strapped down while the torso isn’t secured, torso movement can transmit force through the neck—exactly what you’re trying to prevent.
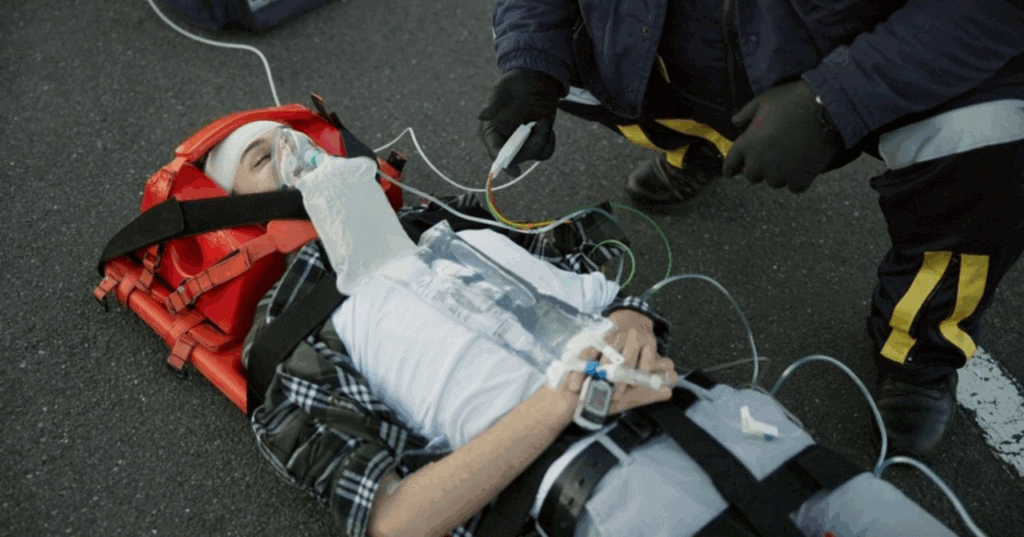
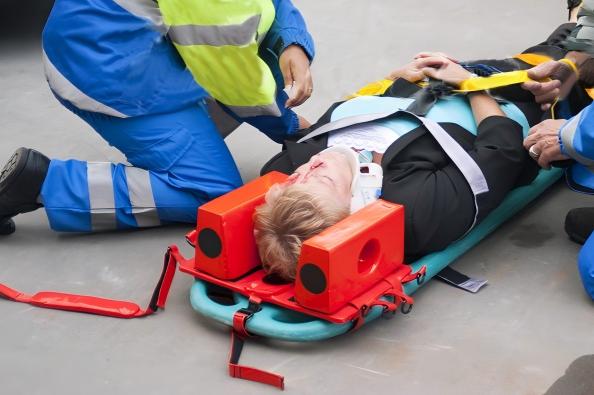
Step 5: Apply the head immobilizer
Now you lock in head stability.
5.1 Place the side supports
- Slide the side blocks into the space between the head and the board, snug against the head.
- Aim for a stable “clamp” effect, ideally supported by the upper shoulder area, but never so tight that it creates pain or pressure injury.
- If bulky dressings change head shape, adjust angle and use thin padding to fill gaps as needed.
5.2 Forehead strap routing
- Place the forehead strap across the forehead, roughly above the eyebrows, clear of the eyes.
- Anchor both ends to the side blocks/base plate connection points and tighten to “secure, not crushing.” You want to stop rotation and side-to-side motion without creating pressure marks or headache.
5.3 Chin strap: use or skip?
- If your device includes a chin strap, route it per manufacturer instructions under the chin and toward the back of the head.
- Key rule: never compress the soft tissues of the neck or compromise the airway.
- If facial trauma or discomfort is present, follow your team’s protocol—some systems minimize or avoid chin straps depending on patient condition and collar support.
5.4 Fine-tune and confirm
- Check for gaps; use a towel/foam sparingly to equalize pressure.
- Keep ears as visible as possible for assessment (drainage/bleeding) and communication.
- From above, confirm the head–neck–torso line is straight and the immobilizer is centered and not shifted.
At this point, the patient should be fully secured to the board with the head immobilizer holding alignment.
5) Pre-Transport Safety Checks
Before the lift to the stretcher or the move into the ambulance, run this checklist. It’s how you avoid “it looked fine… until we moved.”
| Check | What you’re confirming | Red flags to fix now |
|---|---|---|
| Strap tension is appropriate | Torso straps secure without restricting breathing; limb straps not cutting circulation; forehead/chin straps not compressive | Too tight: shallow breathing, pain, pale/swollen skin. Too loose: shifting during lift/bumps |
| Neutral head/neck alignment | Head and neck are neutral and in-line; minimal/no head motion | Head still wiggles: adjust side block placement and strap tension |
| Nothing can slip loose | Velcro fully seated, buckles locked, strap ends stowed; side blocks firmly attached | Loose tails snag; Velcro not pressed down can peel open |
| Neurovascular reassessment | Distal color/temp/cap refill; (awake) compare sensation/movement before/after | New numbness or worse pain suggests strap pressure or malposition |
| Comfort + pressure points | Protect occiput/shoulders/sacrum as needed; minimize board time when feasible | Extended board time increases pain/pressure injury risk |
| Airway & vomiting readiness | Suction ready; breathing monitored; secretions addressed | Respiratory decline gets priority—adjust per protocol |
| Team coordination | Clear lift commands and route; ongoing monitoring during transport | The “lift moment” is where shifts happen—move slow and synchronized |
6) Turning “Good Technique” Into “Reliable Operations”
Technique matters—but consistent outcomes also depend on your setup:
- Strong compatibility with your spine boards and collars
- Strap logic that’s easy to teach and hard to mess up
- Materials that fit high-frequency use: water-resistant, wipe-clean, disinfection-friendly
- Design details that support assessment: ear visibility, stable structure, durable attachment
Professional Gear, Reliable Choice
Jiekang Medical is a specialized manufacturer focused on emergency transport and immobilization equipment. We support OEM/ODM projects and provide the documentation global buyers typically need for medical device sourcing (such as FDA/CE-related materials, depending on product scope and registration requirements).
Our head immobilizer is built with high-density, waterproof plastic and designed for real-world use: lightweight, metal-free, easy to clean, and ear-visible for better patient monitoring. It’s widely used across hospitals, fire/rescue teams, military units, and EMS training centers, and it pairs smoothly with spine boards and cervical collars to help teams stabilize patients safely and comfortably.
If you’re sourcing a head immobilizer that’s compatible, training-friendly, and built to professional expectations, we’d love to support your evaluation.

